Pinny With Bag
Time: About 1 hour
Ability: Beginner/Average.
Not to taxing, an easy piece to work on sewing machine skills.
You Will Need:
1m or so of fabric.
Ideally a piece with a long length (2m) for the frill. If not you can join pieces together.
A Sewing Machine.
2m of bias binding (longer or smaller for larger/smaller fit), in a colour to go with fabric.
Chalk for marking.
Needle and Thread.
Thread should be a colour which shows up in the chosen fabric.
Iron.
Good Scissors.
Paper and Fabric ones.
Flat Surface.
Newspaper/paper and sellotape if working from the pattern below.
Pinny Pattern:

Abbreviations:
RS - Right Side of fabric (the side you want to see).
WS - Wrong Side of fabric.
BB - Bias Binding.
1. Cutting out the pattern and fabric
1.1 Place fabric WS down onto flat surface and lay the cut out pattern on top RS up. In a way, that as little of the fabric will be wasted as possible.
1.2 Pin in place and cut around.
The piece of pattern for the bag has 4 X's which mark the place for the handles, to make sure you get these in the right place do a tailors tack on each square. For Tailors Tack See Extras.
1.3 Remove pins and patterns from fabric.
Pattern can be kept and reused, fold up and pop in a plastic wallet.
Note: If fabric is not long enough for frill, cut as long a strip as possible, mark where the material ends on the pattern and move pattern to continue length of frill. Adding a few extra cm for the hem.


2. Pinny
2.1 With the chalk mark the 1.5cm hem around the side/bottom curves of the pinny.
2.2 With your fabric scissors snip into the hem mark on the curves.
2.3 Fold and press hem, WS to WS.


3. Frill
3.1 If piece cut is not long enough join ends together by placing the 2 pieces RS together, sew (short) end together with 1.5cm hem, press hem flat.
3.2 Fold frill in half WS to WS length ways and press.
3.3 Mark with chalk every 10cm/4" and 2.5cm/1" along the edge of the frill (not the fold edge).


4. Joining the frill to the pinny
This bit is a little tricky, just make sure you have a flat surface, pins and pincushion otherwise you will end up with a mouth full of pins.
The frill runs down the side of the pinny and along the curved bottom and back up the other side.
4.1 Start at the top of the pinny WS up, place the frill length ways (not folded edge) along the pressed hem of the pinny. Using the markings fold the frill every 12.5cm/5" over by about 2.5cm/1". Pin securely in place.
4.2 Fold the frills and pin equally around the edge of the pinny.
4.3 Once the frill is in place, step back and make sure you are happy with the frills. adjusting anything you are not happy with.
If you are happy to machine sew with pins carry on to step 4.3; if not, with your needle and thread loosely tack frill in place and remove pins.
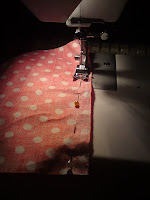
4.4 From the top of the pinny machine stitch down, using the sewing machine foot to follow the edge of the pinny. Remembering the reverse stitch at the end and the beginning and removing pins as you sew.
4.5 Check the back of the pinny to make sure the stitching runs through the frills and the pinny.
I like to do a second line of machine stitching running parallel to the first, just to give the frills extra security.


5. The Pocket
5.1 Fold top hem of pocket over WS to WS. Iron, pin and machine sew in place.
5.2 Place the pinny RS down, now choose where you would like to place the pocket and pin in place.
Again if you are happy to machine sew with pins in, carry on to step 5.3; If not with your needle and thread loosely tack pockets in place and remove pins.
5.3 Machine sew pocket in place. Down first side, along the bottom and back up the next side and again remembering to reverse stitch at the end and the beginning.


6. The Tie
Cut about 30cm or so off the Bias Binding (BB) and keep to one side to use for the bag handles.
The BB needs to be long enough to tie around the wearer's waist. Please make sure the length you have is ok before sewing in place.
The BB needs to be long enough to tie around the wearer's waist. Please make sure the length you have is ok before sewing in place.
6.1 With a pin mark the middle of the length of BB and do the same with the top of the pinny, match pins up and remove, making sure there is equal length of BB on each side of the pinny.
6.2 Fold the BB over the top of the pinny and pin in place, no need to fold the tie ends of the BB.
6.3 Sew over the folded BB along the top of the pinny, again remembering to reverse stitch at the end and beginning.
6.4 Pinny done.


7. The Bag
7.1 Cut the set aside BB in half, should be at least 15cm long. One for each strap.
7.2 Using the tailor tacks, pin end of handles in place making sure they are not twisted and there is one handle on each side pinned in at both ends, using the tailor tacks as guides.
7.3 Machine sew handles in place. I like to do a square.
7.4 Fold the bag in half RS to RS and sew 1.5cm hem down the side and along the bottom of the bag, trim hem and thread and fold RS out, pushing the corners of the bag out.


Press the pinny and the bag with iron and neatly fold the pinny inside the bag.
Hang in your kitchen ready for your next baking extravaganza.

Extras:
tailor's tack - loose, looped sewing stitch used to transfer markings for darts, etc., from a pattern to material.
To do a tailor's tack you use your needle and thread, making sure the thread is a colour which will show up in your fabric. With a really long piece of thread, thread your needle, placing the needle in the middle of the thread so you have two equally long pieces. Loosely sew through the pattern and the fabric from one corner of the cross to the other and then back through the over line in a very loose stitch.
This forms a cross on the other side of the fabric. Snip the thread and cut through the fold of the thread, unpin the fabric and gently remove the pattern, the thread should remain in place on the fabric and pattern should not tear, if either happens, snip thread where necessary.
This thread is there in place so you can line up the handles to the bag, in this case. Once done the marking thread can be removed.